
Whether you’re travelling on an iconic outback gravel road, beach driving, or just the occasional sidetrack, having a compressor to regulate tyre pressures or plug a puncture on your vehicle or RV goes a long way to keep you rolling.
The under-bonnet 12V air-compressor in our Troopie had seen better days. It was on its last legs, and the dilemma we faced was whether to replace it with something similar, or choose something else. An under-bonnet type is fine, but being hot and dusty, it’s exposed to the elements to a degree. They’re the two things that will shorten the life of any compressor. Additionally, the current compressor location was taking up the space for a second battery; something that was on the drawing board for a future install, so we had to look for another location.
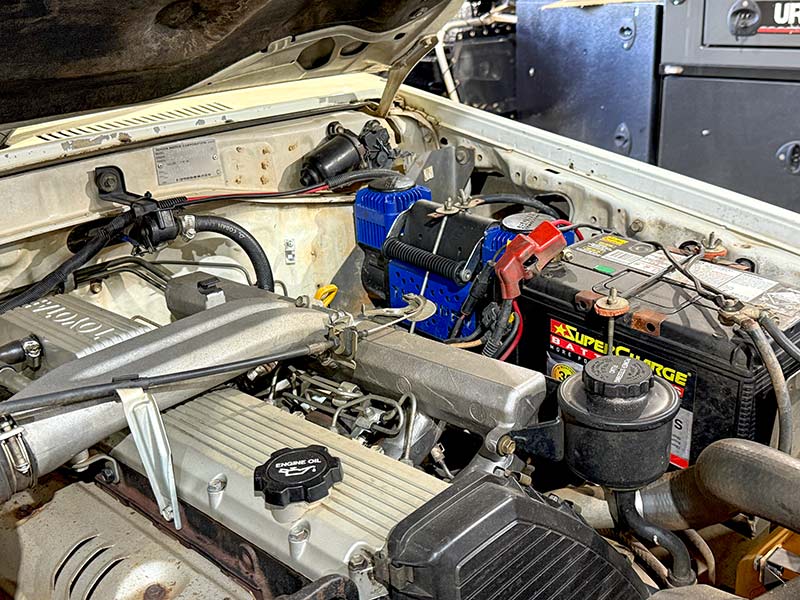
Compressors draw a lot of current (amps), so locating yours as close to a battery source as possible is good practice. There was already a 120Ah lithium house battery in the vehicle, so we figured we could utilise it as our power source for now. This Troopie is a work in progress, and a rear upgrade fit-out is planned down the track. Until then though, we’ve opted for a behind-the-passenger-seat solution.
AIR-COMPRESSOR PROJECT
We decided to go for the new Oricom twin-cylinder air-compressor. It comes as a kit, ready to mount in a vehicle. Inside the kit, there’s a compressor with a large base plate and attachment mounting holes. There’s also a bag of bolts, a couple of plug-and-play, fused, pre-wired looms, an on/off toggle switch, an accessory bag with a 6m air hose, and a very nice inflation hand-piece with a digital readout.
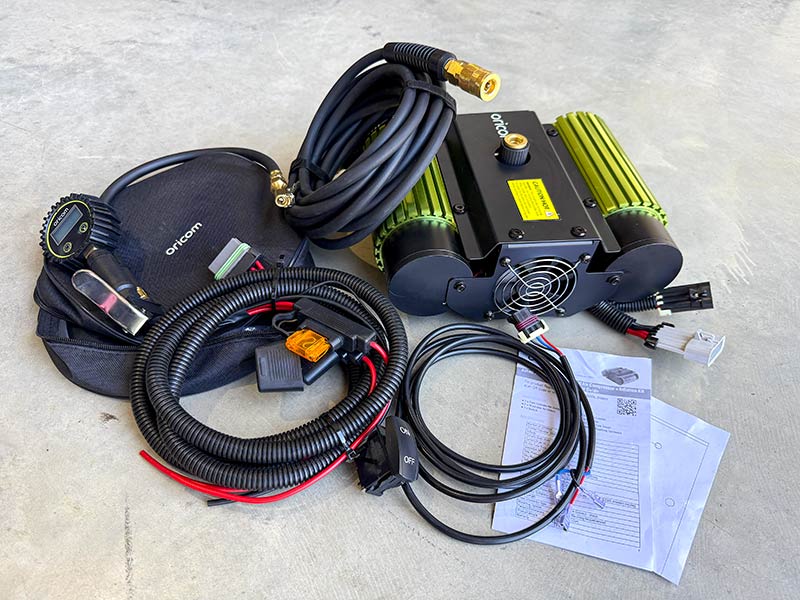
Throw in a set of instructions and a template to assist with accurate positioning for fastening the compressor, and you’re all sorted.
Having decided the exact location for the install, we double-checked the seat had clearance when fully reclined. Then, with the seat moved forward, we again checked there was easy access to attach the 6m air hose. For now, we thought the switch should be located next to the air-compressor. That way, the plug-and-play harness could then be fed through the cupboard to the lithium battery.
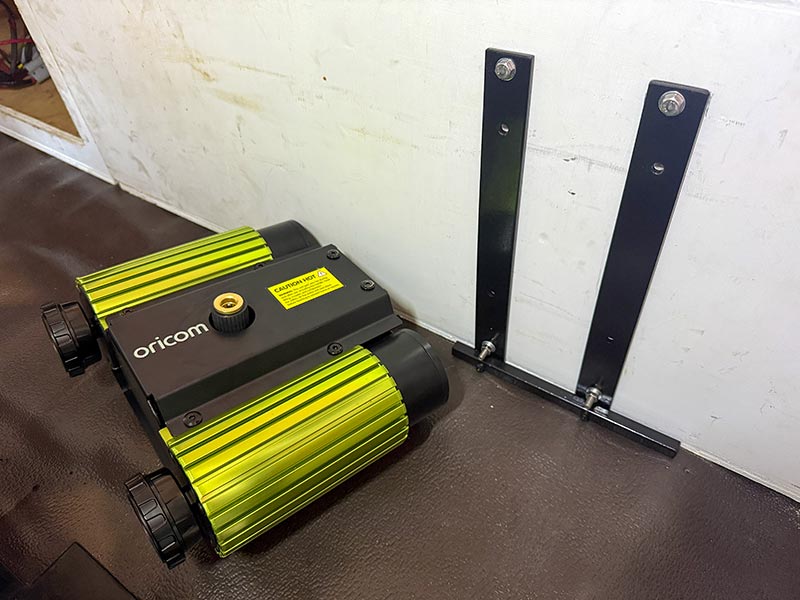
As the air-compressor weighs in at around 10kg and we’re using the lightweight cupboard for mounting it vertically, we decided it best to transfer the weight of the compressor through to the floor of the vehicle. To do this, we made a steel bracket that sat on the floor. We then added four holes to it so we could bolt the bracket to the cupboard. After painting the bracket and fixing it in place, we mounted the compressor to the bracket in such a way that the compressor had the necessary clearance around it.
With the unit in position, it was time for the wiring. Originally, we thought about using a 50A Anderson connector, but realised the high current draw would exceed the rating of an Anderson, given the air-compressor comes with two circuits, each with 40A blade fuses. For now, we’ve attached some crimped ring terminals to make the battery connections. After the power supply wiring was put in position, we opted to place the on/off toggle switch in an aftermarket plastic mounting box that’s secured next to the compressor.
HOW IT WENT
This was a relatively easy install. The hardest part was deciding on the air-compressor mounting location. Did it really need the fabricated bracket? Probably not, if we had attached it to something more substantial. Every vehicle will be different, so it just depends on your situation.
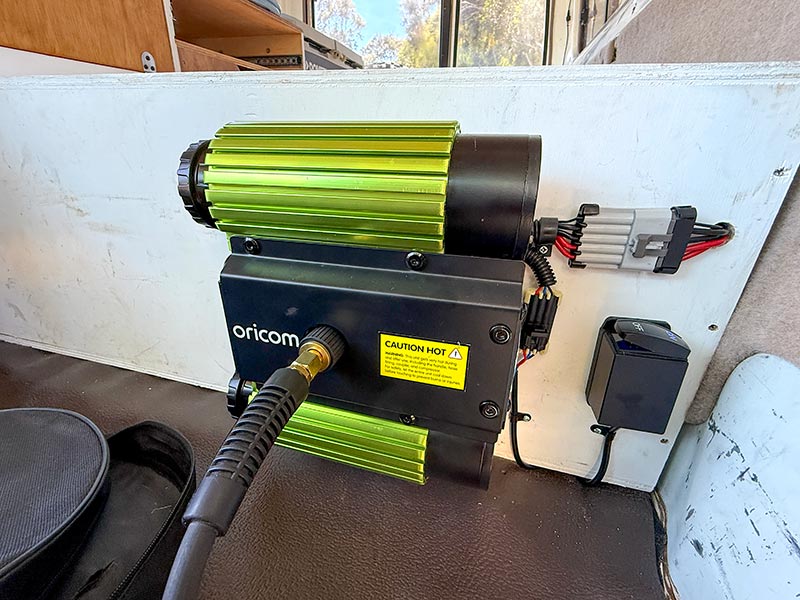
Our location works fine for now, and the accessory bag with hose and the air trigger hand-piece are stored under the passenger seat. All we need to do is slide the seat forward, open the bag, attach the air hose and hand-piece, and turn on the compressor. One major benefit of our mounting location is the 6m hose allows us to get to every vehicle tyre as well as the wheels of our trailer!
OUR THOUGHTS
Compressors come in all shapes, sizes, and prices, and we wanted a fixed mounted style over a portable alligator clip type, mainly due to the convenience and speed of use.
We’ve learnt over time that if it’s easy to use, you’re more likely to use it more often. This will certainly be the case with lowering and re-inflating tyre pressures to suit the conditions.
An added bonus: if we get a puncture, having it mounted this way allows us to get air in that tyre within a couple minutes. Speaking from experience, that will be a godsend when on uneven terrain. Keeping that tyre inflated allows you to repair it on the go, or at least easily get a jack underneath if you have to change it out.
Last of all, we wanted a dual-circuit twin air-compressor, not only for its 300L max air flow rate, but having two separate individually circuited compressors.
The unit from Oricom met the brief, and having this style and type is almost like we’re carrying a spare compressor with us.


